iOS APNs
Apple Push Notification service(APNs)
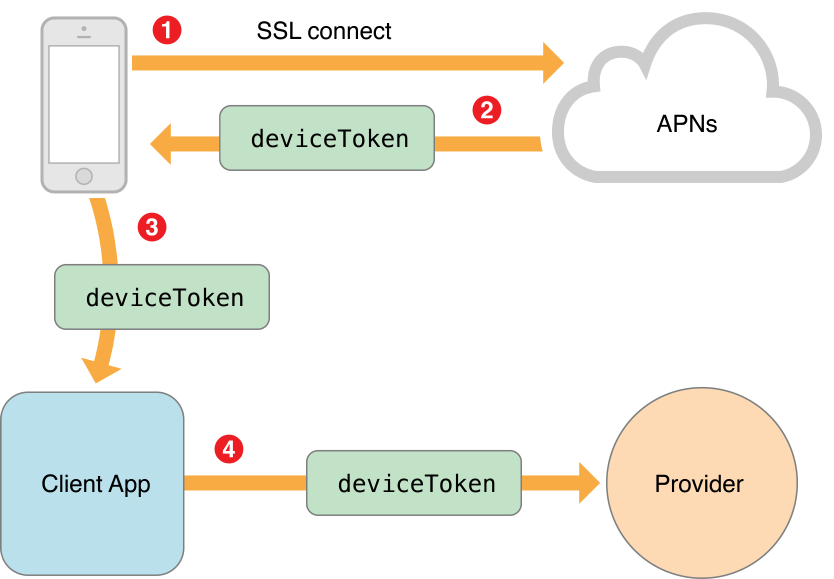
推送服务的工作流程:
- APP向系统注册推送服务
- 设备从APNs请求deviceToken
- 通过代理方法将deviceToken返回给APP
- APP将deviceToken发送给应用后台服务器(Provider)
- 应用后台服务器保存deviceToken,然后在需要推送通知的时候,给APNs发送信息,使用deviceToken标识所要送达的客户端
- APNs将后台服务器发过来的数据推送到设备
- 设备将消息分发给应用程序
- 在使用推送功能的时候,需要在开发者中心创建支持Push Notification的证书,并且将证书和私钥用于应用后台服务器与APNs之间通信
环境配置
- 开发者账号
- iOS真机(iPhone、iPad、iPod)
- 后台服务器
- 网络
配置Certification,App ID,Provisioning Profiles:
打开keychian,钥匙串访问,证书助理,从证书颁发机构请求证书,生成获取证书请求文件(CSR),选择存储到磁盘
新建App ID选择开启Push Notification 然后Push Notification选项是可以配置的,我们选择Development,选择Create Certification,然后页面会跳转到新建证书的位置,选择Apple Push Notification service SSL(sandbox)我们这里实在debug模式下远程推送的,选择文件是传入生成的获取证书请求文件(CSR)文件,选择download 默认是aps_development.cer,双击文件安装 然后新建Provisioning Profiles, 选择iOS App Developerment,continue,选择刚才新建的App ID,continue,然后到了最容易混淆的select certification,刚才我们不是建立了新的证书么,怎么没有显示在这里,嗯,是不是哪里出错了?答案是否定的,只要选择正在使用的开发证书就可以了。最后选择设备,就是可以测试远程推送的设备。点击Generate下载到本地以后,双击安装。看下状态,如果是invalid,那么肯定是哪里有问题,很可能是选证书的时候错了,如果你有多个develop证书的话。OK,预备工作到这里结束了 我们建立一个App,到AppDelegate.m文件
- (BOOL)application:(UIApplication *)application didFinishLaunchingWithOptions:(NSDictionary *)launchOptions {
    //判断是否注册了远程通知
    if (![application isRegisteredForRemoteNotifications]) {
        UIUserNotificationSettings *uns = [UIUserNotificationSettings settingsForTypes:(UIUserNotificationTypeAlert|UIUserNotificationTypeBadge|UIUserNotificationTypeSound) categories:nil];
        [application registerUserNotificationSettings:uns];
        //注册远程通知
        [application registerForRemoteNotifications];
    }
    return YES;
}

//注册成功,返回deviceToken
- (void)application:(UIApplication *)application didRegisterForRemoteNotificationsWithDeviceToken:(NSData *)deviceToken
{
    NSLog(@"%@", deviceToken);
}

//注册失败
- (void)application:(UIApplication *)application didFailToRegisterForRemoteNotificationsWithError:(NSError *)error
{
    NSLog(@"%@", error);
}

//接收到推送消息
- (void)application:(UIApplication *)application didReceiveRemoteNotification:(NSDictionary *)userInfo
{
    NSLog(@"remote: %@", userInfo);
}
另外,在xcode6下记得开启在Capabilities里面开启Background Mode,选择Background fetch和Remote Notifications 接着,我们要建立服务端推送消息,我们可以在本地测试。下载PushMeBaby 运行工程,如果遇到编译错误 ‘CoreServices/../Frameworks/CarbonCore.framework/Headers/MacTypes.h’ file not found 把前面很长的那段路径去掉换成就可以了 然后运行刚才的App程序获取deviceToken 证书需要加入到工程目录下,这样可以通过NSBundle直接搜到,然后修改ApplicationDelegate.m
- (id)init {
    self = [super init];
    if(self != nil) {
        //77e231f0 76257e00 eed93ac6 47b52c78 12bae79f 9c9d1c67 4c990589 36c9a235 ---- 保留空格
        self.deviceToken = @"";
        //推送内容,JSON格式
        self.payload = @"{"aps":
        {"alert":"This is some fancy message.",
        "badge":1,
        "sound":"new_order_woman.caf"}}";
//alert推送的消息体
//badge红点显示
//sound推送到达以后播放的声音
        //获取证书路径
        self.certificate = [[NSBundle mainBundle] pathForResource:@"aps_development" ofType:@"cer"];
    }
    return self;
}
最后,运行程序,点击push手机上的应用程序很快就收到推送了